
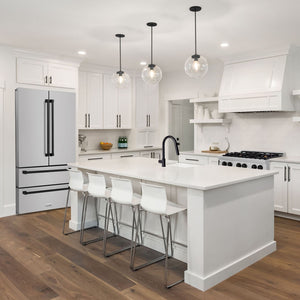


If you're looking to improve the ventilation in your kitchen, installing a stove hood vent is a crucial step. A stove hood vent helps to remove smoke, steam, and cooking odors from your kitchen, making it a more pleasant and healthier space to cook in. In this guide, we'll provide you with detailed, step-by-step instructions on how to install a stove hood vent in your home.
Installing a stove hood vent might seem like a daunting task, but with the right tools and instructions, it can be a relatively simple process. In this guide, we'll cover everything you need to know to install a stove hood vent, from choosing the right location to connecting the vent to your home's ductwork. Whether you're a seasoned DIYer or a beginner, you'll be able to follow our instructions and successfully install a stove hood vent in your kitchen.
When installing a stove hood vent, it is important to assess your kitchen's ventilation needs before making any decisions. This will ensure that you choose the right size and type of range hood vent for your cooking surface, and understand the different venting options available.
The first step in assessing your kitchen's ventilation needs is to determine the size and type of stove hood vent that you need. The size of your range hood vent should be based on the size of your cooking surface. As a general rule, your range hood should be at least as wide as your cooktop, and ideally a few inches wider on either side.
In addition to size, you will also need to consider the type of range hood vent that is best for your kitchen. There are two main types of range hood vents: vented and ductless. Vented range hoods vent air outside of your home, while ductless range hoods recirculate air back into your kitchen.

When it comes to venting options, there are pros and cons to both ducted and ductless range hoods.
Ducted range hoods are generally more powerful and effective at removing smoke, steam, and cooking odors from your kitchen. However, they require ductwork to be installed, which can be expensive and time-consuming.
Ductless range hoods, on the other hand, are easier to install and do not require ductwork. However, they are generally less powerful than ducted range hoods and may not be as effective at removing smoke and cooking odors from your kitchen.
When choosing between vented and ductless range hoods, it is important to consider your kitchen's layout, your cooking habits, and your budget. If you do a lot of cooking and have a large kitchen, a ducted range hood may be the best option for you. However, if you have a smaller kitchen or are on a tight budget, a ductless range hood may be a better choice.
Before installing a stove hood vent, you need to prepare by gathering the necessary tools and materials, taking safety precautions, and disconnecting power.
To install a stove hood vent, you will need the following tools and materials:
Make sure you have all of these items on hand before beginning the installation process.
Safety is important when installing a stove hood vent. Before beginning the installation process, make sure to take the following safety precautions:
By taking these safety precautions, you can ensure a safe and successful installation process.

Before cutting the hole for the ductwork, you need to create a template for the vent. To do this, you can use a piece of paper or cardboard to make a template that matches the size and shape of the vent. Hold the template up to the area where you plan to install the hood vent and mark the outline of the template with a pencil. This will help you to ensure that the vent is installed in the right location.
Once you have created the template for the vent, you can use it to mark the location where you will cut the hole for the ductwork. Make sure to follow the manufacturer's instructions for the size and shape of the hole. If you are venting through the roof, make sure that the vent goes all the way outside and not just into the attic.
To cut the hole, you can use a reciprocating saw or a jigsaw. Make sure to wear safety goggles and a dust mask to protect yourself from debris. Cut along the outline that you marked with the pencil, and then remove the cutout piece.
If you are cutting through an outside wall, make sure that you are not going into a soffit or any other obstruction. While the installation is more extensive, and they can be more expensive (ranging from $65 - $6,000), added ventilation is worth the investment.
When installing the ductwork for your stove hood vent, there are a few key steps to keep in mind to ensure a successful installation. Here are the three main steps to follow:
Before you begin securing the ducting to the vent hood, make sure that you have the correct size duct for your specific vent hood model. Once you have confirmed this, you can begin the installation process.
To secure the ducting to the vent hood, you will need to use screws to attach the duct flange to the vent hood. Be sure to use the appropriate screws for your specific model and follow the manufacturer's instructions carefully. This will help to ensure that the ducting is securely attached to the vent hood and will not come loose over time.
When routing the ductwork for your stove hood vent, it is important to keep a few key things in mind. First, you will need to determine the best route for the ductwork based on the layout of your kitchen and the location of your stove. This may involve using elbows or other fittings to navigate around obstacles.
Once you have determined the best route for the ductwork, you can begin installing it. Be sure to follow the manufacturer's instructions carefully and use the appropriate ducting for your specific model. This will help to ensure that the ductwork is installed correctly and will function properly.
To ensure that your stove hood vent functions properly, you need to properly seal and insulate the ductwork. This will help to prevent air leaks and ensure that the air is properly vented outside.
To seal the ductwork, you can use foil tape to cover any gaps or seams. This will help to prevent air leaks and ensure that the air is properly vented outside. Additionally, you may want to consider insulating the ductwork to help prevent heat loss and ensure that the air is properly vented outside.

Before connecting the electrical wiring, make sure that the circuit breaker is turned off. This will prevent any electrical accidents from happening. If you are not confident in your electrical work, it is recommended to hire a licensed electrician to do the job.
To connect the electrical wiring, splice the white wire to the white fixture lead, the black wire to the black lead, and the grounding wire to the green lead. Make sure that the electrical cover is replaced after the connections are made.
When attaching the vent to the exterior cap, make sure that the vent goes all the way outside and not just into the attic. If you are venting through an outside wall, make sure that you are not going into a soffit or any other obstruction. It is recommended to use a vent cap to cover the opening to prevent any animals or debris from entering the vent.
After attaching the vent, turn on the power and test the range hood to make sure that it is working properly. If you notice any issues, turn off the power and double-check the connections.
Remember, if you are not comfortable with electrical work or vent installation, it is always best to hire a licensed professional to do the job. Safety should always be your top priority when working with electrical wiring and vent covers.
Congratulations! You have successfully installed your stove hood vent. Now it's time to finish up the installation process by applying caulk and installing filters.
Before you can call your installation complete, you need to apply caulk around the edges of the hood to prevent air from escaping. This will ensure that all the smoke and heat generated while cooking is properly vented outside.
To apply the caulk, simply run a bead of it along the edges of the hood where it meets the wall or cabinet. Use a caulking gun for precision and to ensure the caulk is applied evenly.
Once the caulk is applied, use a damp cloth to wipe away any excess. This will give your installation a clean and finished look.
The next step is to install the filters. These filters help to trap grease and other cooking byproducts before they enter the ventilation system. This will help to prevent buildup in the ductwork and ensure that your ventilation system works efficiently.
To install the filters, refer to the manufacturer's instructions. Most filters simply slide into place and are held in by clips or screws.
Finally, it's time to test your range hood. Turn on the fan and make sure that it is properly venting outside. Check for any leaks or gaps in the ductwork and make sure that the damper is functioning properly.
With the filters in place and the range hood properly venting, you can rest assured that your kitchen is properly ventilated and that you are cooking in a safe and healthy environment.
Remember to clean your filters regularly to ensure that they continue to function properly and to prevent the buildup of grease and other cooking byproducts in your ventilation system.

To ensure that your stove hood vent functions properly, it is important to perform regular maintenance.
Here are some tips to keep your stove hood vent working efficiently:
The filter in your stove hood vent traps grease and other particles, preventing them from entering your home or ductwork. Over time, the filter can become clogged, reducing the effectiveness of your vent. You should clean or replace the filter every three to six months, depending on how often you use your stove. If you have a ductless range hood, you should also replace the charcoal filter every six months to a year.
Grease buildup can be a fire hazard and reduce the efficiency of your stove hood vent. To prevent this, wipe down the exterior of your vent hood with a damp cloth and a mild detergent every few weeks. You should also clean the underside of the hood and the fan blades every three to six months, depending on use.
If you notice smoke coming from your stove hood vent, it could be a sign that there is a problem with the vent or ductwork. Check that the vent is properly installed and that the ductwork is not clogged or damaged.
If you have a ductless range hood, consider upgrading to a vented model. Vented range hoods are more effective at removing smoke and cooking odors from your home, and they require less maintenance.
When it comes to installing a stove hood vent, you have two options: hiring a professional or doing it yourself. Each option has its advantages and disadvantages, and it's important to weigh them carefully before making a decision.
If you're not comfortable working with electrical wiring or don't have experience with home improvement projects, it's best to call a professional electrician or contractor to install your stove hood vent.
This is especially true if you need to install new wiring or ductwork, as these tasks require specialized knowledge and tools. Hiring a professional can also save you time and ensure the job is done correctly. Professional installation usually comes with a warranty or guarantee, giving you peace of mind and protecting you from unexpected costs if something goes wrong.
However, professional installation can be expensive, and the cost can vary depending on your location and the complexity of the job. It's important to get quotes from several contractors and compare them carefully before making a decision.
While upgrading, consider investing in energy-efficient kitchen appliances to save on energy costs and reduce your environmental footprint.
If you're an experienced DIYer and feel confident working with electrical wiring and home improvement projects, you may be able to install your stove hood vent yourself. This can save you money and give you a sense of satisfaction from completing the project on your own.
Before starting the installation, make sure you have all the necessary tools and materials, including a drill, screws, duct tape, and a vent hood. Follow the manufacturer's instructions carefully and take your time to ensure that everything is installed correctly.
It's also important to follow safety guidelines when working with electrical wiring and power tools. Always turn off the power to the circuit before working on it, and wear protective gear such as gloves and safety glasses.
In conclusion, installing a stove hood vent can greatly improve your kitchen's air quality by removing smoke, odors, and grease. By following this step-by-step guide, you can tackle the installation with confidence. However, if you find the process too challenging, seeking professional help is always a wise option.
For those looking to purchase a high-quality stove hood vent, visit Home Appliance Paradise. They offer a wide range of top-notch options to suit any kitchen style and budget. With their exceptional customer service and extensive selection, you're sure to find the perfect vent for your needs.
The installation time for a stove hood vent depends on various factors like the type of hood, the size of the kitchen, and the complexity of the installation. On average, it takes around 2-4 hours to install a stove hood vent.
It is possible to install a vent hood yourself, but it is recommended to hire a professional for the installation. A professional installer has the necessary tools and expertise to ensure that the installation is done correctly and safely.
The cost of installing a stove hood vent varies depending on various factors like the type of hood, the size of the kitchen, and the complexity of the installation. On average, the cost can range from $200 to $1000.
Yes, it is necessary to vent range hoods outside to ensure proper ventilation and to avoid the buildup of harmful fumes and gases. Venting outside also helps to prevent the growth of mold and mildew in the kitchen.
The proper vent for a range hood depends on the type of hood and the size of the kitchen. The most common types of vents are wall-mounted vents, ceiling-mounted vents, and under-cabinet vents. It is important to choose the right size and type of vent to ensure proper ventilation.
A range hood and a vent hood are the same thing. They are both used to vent smoke, steam, and cooking odors from the kitchen. The term "range hood" is more commonly used in the United States, while "vent hood" is more commonly used in other parts of the world.
Only 10 left In Stock
ZLINE Crown Molding #2 for Wall Range Hood (CM2-455/476/477/667/697)ALL CROWNS AVAILABLE (Click Links Below):Crown 1: CM1-455/476/477/667/697Crown ...
View full detailsOnly 9 left In Stock
ZLINE 36 In. Outdoor Ducted Wall Mount Range Hood In Outdoor Approved Stainless Steel 667-304-36 The ZLINE 36 In. Outdoor Ducted Wall ...
View full detailsOnly 10 left In Stock
Forno Alta Qualita 24″ Stainless Steel Pro-Style Built-In Dishwasher FDWBI8067-24S Features Touch Control 6 washing programs Stainless steel front...
View full detailsOnly 10 left In Stock
Forno 60" 27.6 cu. ft. Refrigerator & Freezer in Stainless Steel FFFFD1933-60S This Forno 60" Pro-Style Refrigerator/Freezer Dual Combination c...
View full detailsOnly 5 left In Stock
Forno Galiano 36-Inch French Door Electric Range with Convection Oven in Stainless Steel (FFSEL6917-36) The Forno Galiano 36″ French Door Alta Qual...
View full details{"one"=>"Select 2 or 3 items to compare", "other"=>"{{ count }} of 3 items selected"}

